추가 용량 없이 Android 폰트 사용하기
08 March 2018

프로젝트에서 앱의 용량은 골칫거리이다. 국내에서야 용량이 커도 네트워크 망이 워낙 잘되있으니 괜찮지만 해외에서는 사정이 좋지 않기 때문에 용량이 좀 크다 싶으면 설치도 하지 않는다. 아니 엄밀히 말하자면, 설치를 못하는것이다 앱 하나 좀 해볼려고 했더니 다운로드가 반나절 걸리면 대체 누가 설치를 할 수 있겠는가. 그래서인지 Google에서 준 글로벌 공략 가이드 책에서도 용량을 신경써야 할 중요한 요소로 보고 있다.
용량도 줄이고 디자인도 챙기는 플랫 디자인
 물론 앱의 용량을 줄이는 것은 쉽지 않다. 코드에서 줄일수 있는 양은 한계가 있기 때문에 결국 그래픽 에셋을 줄여나갈 수 밖에 없는데 그렇게 되면 앱의 디자인이 밋밋해지고 차별화도 전혀 되지 않는다. 어떻게 보면 그런 상황에서 파생한 해결책이 플랫 디자인인데 이 방법은 기하학적인 배치와 폰트 를 통하여 디자인 적으로도 프로그래밍 적으로도 합리적인 결과물을 얻을 수 있게 해준다.
폰트를 적용하는 방법
그렇다면 폰트를 어떻게 프로젝트에 적용시킬 수 있을까? 다행히도 Android 8.0 에서는 Font API가 추가되어 이전보다 손쉽게 폰트를 적용시킬 수 있다. /app/src/main/res/ 경로에 font라는 폴더를 만들고 안에 폰트 파일을 넣은 다음 /app/src/main/res/xml에 Font Family에 대한 내용을 xml로 작성해준 다음 적용하고 싶은 TextView 혹은 EditText에 android:fontFamily 프로퍼티를 사용하여 적용해주면 된다.
Font Family를 XML로 작성하기
<?xml version="1.0" encoding="utf-8"?>
<font-family xmlns:android="http://schemas.android.com/apk/res/android">
    <font
        android:fontStyle="normal"
        android:fontWeight="400"
        android:font="@font/lobster_regular" />
    <font
        android:fontStyle="italic"
        android:fontWeight="400"
        android:font="@font/lobster_italic" />
</font-family>
TextView에 Font Family를 사용하여 폰트 적용하기
<TextView
        android:layout_width="wrap_content"
        android:layout_height="wrap_content"
        android:fontFamily="@font/lobster"/>
추가 용량 없이 폰트 사용하기
하지만 위의 방법을 사용하면 어쩔수 없이 사용할 폰트에 대한 용량이 들어가게 된다. 그래픽으로 추가하는 것보다는 덜 들어가긴 하지만 이마저도 아깝다면 한가지 방법이 있는데, 바로 디바이스에 내장되어 있는 시스템 폰트를 사용하는 것이다. Android는 배포하면서 OS에서 사용될 폰트를 같이 배포하게 되는데 이를 사용하게 되면 디바이스 내의 경로에서 폰트를 가져오게 되므로 아무런 추가 용량을 필요로 하지 않는다.
fontStyle 사용하여 시스템 폰트 사용하기
Android 구버전부터 사용되던 방법인데, fontStyle 프로퍼티를 사용해서 폰트를 바꾸는 방법이다. 이 방법은 디바이스에 탑재되어 있는 폰트보다 선택 폭이 적다는 단점이 있으나 특별한 작업을 하지 않아도 바로 프로퍼티로 적용할 수 있다는 장점이 있다. 적용하고 싶은 TextView 혹은 EditText에 android:fontFamily 프로퍼티를 사용하여 적용해주면 된다. 유의할 점은 normal 값을 활용할 경우 사용자가 지정한 시스템 폰트로 적용된다는 점과 시스템 폰트는 Android 버전에 차이가 있다는 점이다. 4.1 버전 아래에선 시스템 폰트로 Droid Sans 가 쓰였고, 4.2 ~ 5.0미만 버전에서는 나눔고딕 이, 5.0이상 버전에서는 NotoSans 가 쓰이고 있다. 물론 제조사에서 배포 시 추가한 폰트를 사용자가 선택해서 쓰는 경우는 예외로 한다.
TextView에 fontStyle를 사용하여 시스템 폰트 적용시키기
<TextView
        android:layout_width="wrap_content"
        android:layout_height="wrap_content"
        android:fontFamily="serif"/>
fontStyle 값에 따라 적용되는 폰트
| fontStyle 값 | 실제 적용되는 폰트 |
|---|---|
| normal | 시스템 기본 설정 폰트 |
| casual | ComingSoon.ttf |
| cursive | DancingScript-Regular.ttf |
| monospace | DroidSansMono.ttf |
| san-serif | Roboto-Regular.ttf |
| san-serif-black | Roboto-Black.ttf |
| san-serif-condensed | RobotoCondensed-Regular.ttf |
| san-serif-condensed-light | RobotoCondensed-Light.ttf |
| san-serif-light | Roboto-Light.ttf |
| san-serif-medium | Roboto-Medium.ttf |
| san-serif-smallcaps | CarroisGothicSC-Regular.ttf |
| san-serif-thin | Roboto-Thin.ttf |
| serif | NotoSerif-Regular.ttf |
| serif-monospace | CutiveMono.ttf |
Typeface 사용하여 시스템 폰트 사용하기
그럼 이제 마지막으로 디바이스의 폰트 경로에서 직접 가져와 폰트를 적용하는 방법을 알아보도록 하자. 이 방법을 쓰는 이유는 fontStyle를 쓰는 방법이 편하긴 하지만 지정된 폰트 밖에 못쓰기 때문에 보다 다양한 폰트를 쓰지 못해서인데 하단에 Galaxy S7에 탑재된 폰트 목록을 보면 알겠듯이 내장된 폰트가 엄청 많다 . 물론 기기마다 차이가 있고 제조사 제공 폰트는 호환성 때문에 쓰지 못하지만 2018년 2월 기준 플랫폼 버전 점유율을 기준으로 토대로 AndroidCock, DroidSans, Roboto 폰트는 99.3% NotoSans, DancingScript, CutiveMono는 82.3% 만큼 기기에 탑재되어 있을 가능성이 있으므로 문제없이 사용해도 무방하다. 무엇보다 한중일 폰트를 전부 지원하는 DroidSansFallback, NotoSansCJK를 쓸 수 있다는 점이 가장 큰 장점이라고 할 수 있겠다.
Galaxy S7에 탑재된 폰트 목록
| AndroidClock.ttf NotoSansCJK-Regular.ttc SECCJK-Regular.ttc Clock2017L.ttf CarroisGothicSC-Regular.ttf Clock2016.ttf Clock2017R.ttf ComingSoon.ttf CutiveMono.ttf DancingScript-Bold.ttf DancingScript-Regular.ttf DroidSans-Bold.ttf DroidSans.ttf DroidSansMono.ttf NotoColorEmoji.ttf NotoNaskhArabic-Bold.ttf NotoNaskhArabic-Regular.ttf NotoNaskhArabicUI-Bold.ttf NotoNaskhArabicUI-Regular.ttf NotoSansArmenian-Bold.ttf NotoSansArmenian-Regular.ttf NotoSansBalinese-Regular.ttf NotoSansBamum-Regular.ttf NotoSansBatak-Regular.ttf NotoSansBengali-Bold.ttf NotoSansBengali-Regular.ttf NotoSansBengaliUI-Bold.ttf NotoSansBengaliUI-Regular.ttf NotoSansBuginese-Regular.ttf NotoSansBuhid-Regular.ttf NotoSansCanadianAboriginal-Regular.ttf NotoSansCham-Bold.ttf NotoSansCham-Regular.ttf NotoSansCherokee-Regular.ttf NotoSansCoptic-Regular.ttf NotoSansDevanagari-Bold.ttf NotoSansDevanagari-Regular.ttf NotoSansDevanagariUI-Bold.ttf NotoSansDevanagariUI-Regular.ttf NotoSansEthiopic-Bold.ttf NotoSansEthiopic-Regular.ttf NotoSansGeorgian-Bold.ttf | NotoSansGeorgian-Regular.ttf NotoSansGlagolitic-Regular.ttf NotoSansGujarati-Bold.ttf NotoSansGujarati-Regular.ttf NotoSansGujaratiUI-Bold.ttf NotoSansGujaratiUI-Regular.ttf NotoSansGurmukhi-Bold.ttf NotoSansGurmukhi-Regular.ttf NotoSansGurmukhiUI-Bold.ttf NotoSansGurmukhiUI-Regular.ttf NotoSansHanunoo-Regular.ttf NotoSansHebrew-Bold.ttf NotoSansHebrew-Regular.ttf NotoSansTibetan-Bold.ttf NotoSansJavanese-Regular.ttf SECCJK-Regular-Extra.ttf NotoSansKannada-Bold.ttf NotoSansKannada-Regular.ttf NotoSansKannadaUI-Bold.ttf NotoSansKannadaUI-Regular.ttf NotoSansKayahLi-Regular.ttf NotoSansKhmer-Bold.ttf NotoSansKhmer-Regular.ttf NotoSansKhmerUI-Bold.ttf NotoSansKhmerUI-Regular.ttf NotoSansLao-Bold.ttf NotoSansLao-Regular.ttf NotoSansLaoUI-Bold.ttf NotoSansLaoUI-Regular.ttf | NotoSansLepcha-Regular.ttf NotoSansLimbu-Regular.ttf NotoSansLisu-Regular.ttf NotoSansMalayalam-Bold.ttf NotoSansMalayalam-Regular.ttf NotoSansMalayalamUI-Bold.ttf NotoSansMalayalamUI-Regular.ttf NotoSansMandaic-Regular.ttf NotoSansMeeteiMayek-Regular.ttf NotoSansMongolian-Regular.ttf NotoSansMyanmar-Bold.ttf NotoSansMyanmar-Regular.ttf NotoSansMyanmarUI-Bold.ttf NotoSansMyanmarUI-Regular.ttf NotoSansNKo-Regular.ttf NotoSansNewTaiLue-Regular.ttf NotoSansOlChiki-Regular.ttf NotoSansOriya-Bold.ttf NotoSansOriya-Regular.ttf NotoSansOriyaUI-Bold.ttf NotoSansOriyaUI-Regular.ttf NotoSansRejang-Regular.ttf SamsungKhmerUI-Bold.ttf NotoSansSaurashtra-Regular.ttf NotoSansSinhala-Bold.ttf NotoSansSinhala-Regular.ttf NotoSansSundanese-Regular.ttf NotoSansSylotiNagri-Regular.ttf NotoSansSymbols-Regular-Subsetted.ttf NotoSansSyriacE |
Android 버전에 따라 추가된 시스템 폰트
| Version | Api Level | 탑재된 폰트 |
|---|---|---|
| ~ 4.0 | ~ 14 | DroidSans, DroidSerif, DroidSansMono, DroidSansFallback, Clockopia |
| 4.0 | 14 | DroidSans, DroidSerif, DroidSansMono, DroidSansFallback, DroidSansMono, Roboto, AndroidClock |
| 4.1 | 16 | DroidSans, DroidSerif, DroidSansMono, DroidSansFallback, DroidSansMono, Roboto, Roboto-Light, RobotoCondensed, MTLmr3m, AndroidEmoji |
| 4.2 | 17 | DroidSans, DroidSerif, DroidSansMono, DroidSansFallback, DroidSansMono, Roboto, Roboto-Light, RobotoCondensed, Roboto-Thin, Roboto-ThinItalic, NanumGothic |
| 5.0 ~ | 21 ~ | DroidSans, Roboto, NotoSans, NotoSerif, NotoCJK, CutiveMono, DancingScript |
Android 플랫폼 점유율

2018년 2월 5일 기준
디바이스에 내장된 폰트 확인하기
먼저 Typeface를 사용하여 폰트를 적용하기 위해선 자신이 사용할 폰트의 경로를 알아야하는데 Android Studio 를 사용하여 확인할 수 있다. 디바이스를 연결한 다음 우측 하단의 Device File Explorer를 사용하여 내부 디렉토리를 확인할 수 있는데. /system/fonts/의 경로를 확인해보면 디바이스에 내장된 폰트가 표시된다.
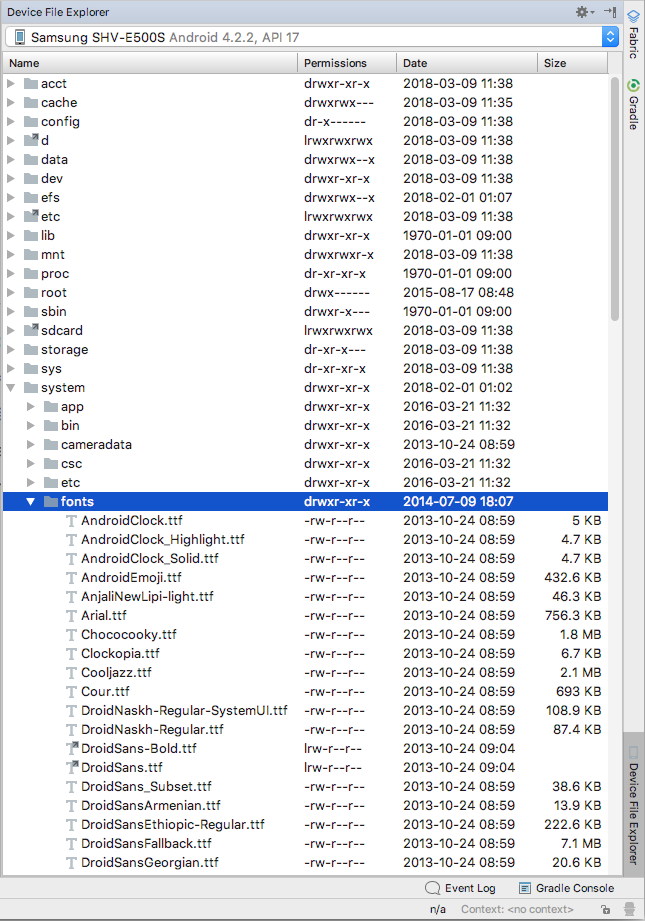
Galaxy One에 내장된 폰트 예시
만약 이 방법을 사용할 수 없을 경우 아래의 코드를 사용하여 폰트에 대한 경로 값을 확인해보도록 하자.
String fontPath = "/system/fonts";
File fontFiles = new File(fontPath);
File fontFileArray[] = fontFiles.listFiles();
String fontPathString = "";
for(File index : fontFileArray)
{
    fontPathString += index.toString();
    fontPathString += "\n";
}
Log.d("font", fontPathString);
TextView에 Typeface를 사용하여 시스템 폰트 적용시키기
위의 방법을 통하여 경로를 확인했다면 본격적으로 TextView에 적용시켜보자.
<?xml version="1.0" encoding="utf-8"?>
<!-- res/layout/에 customfont_activity.xml 작성하기 -->
<LinearLayout xmlns:android="http://schemas.android.com/apk/res/android"
              android:orientation="vertical"
              android:layout_width="match_parent"
              android:layout_height="match_parent"
              android:layout_margin="16dp">
    <TextView
        android:id="@+id/customfont_textview_1"
        android:layout_width="match_parent"
        android:layout_height="wrap_content"
        android:textSize="24dp"
        android:text="Sit Cursus Tristique"/>
    <TextView
        android:id="@+id/customfont_textview_2"
        android:layout_width="match_parent"
        android:layout_height="wrap_content"
        android:textSize="24dp"
        android:text="Sit Cursus Tristique"/>
    <TextView
        android:id="@+id/customfont_textview_3"
        android:layout_width="match_parent"
        android:layout_height="wrap_content"
        android:textSize="24dp"
        android:text="Sit Cursus Tristique"/>
    <TextView
        android:id="@+id/customfont_textview_4"
        android:layout_width="match_parent"
        android:layout_height="wrap_content"
        android:textSize="24dp"
        android:text="Sit Cursus Tristique"/>
    <TextView
        android:id="@+id/customfont_textview_5"
        android:layout_width="match_parent"
        android:layout_height="wrap_content"
        android:textSize="24dp"
        android:text="Sit Cursus Tristique"/>
</LinearLayout>
<!--AndroidManifest.xml에 CustomFontActivity 추가하기 -->
<activity android:name=".view.CustomFontActivity" android:theme="@style/Theme.AppCompat.DayNight.NoActionBar" android:screenOrientation="portrait"/>//CustomFontActivity 작성하기
public class CustomFontActivity extends AppCompatActivity
{
@BindView(R.id.customfont_textview_1) TextView textView1;
@BindView(R.id.customfont_textview_2) TextView textView2;
@BindView(R.id.customfont_textview_3) TextView textView3;
@BindView(R.id.customfont_textview_4) TextView textView4;
@BindView(R.id.customfont_textview_5) TextView textView5;
@Override
protected void onCreate(@Nullable Bundle savedInstanceState)
{
super.onCreate(savedInstanceState);
setContentView(R.layout.customfont_activity);
ButterKnife.bind(this);
String fontPath1 = "/system/fonts/AndroidClock.ttf";
String fontPath2 = "/system/fonts/ComingSoon.ttf";
String fontPath3 = "/system/fonts/CutiveMono.ttf";
String fontPath4 = "/system/fonts/DancingScript-Regular.ttf";
String fontPath5 = "/system/fonts/NotoSansCJK-Regular.ttc";
Typeface typeface = null;
typeface = Typeface.createFromFile(fontPath1);
textView1.setTypeface(typeface);
typeface = Typeface.createFromFile(fontPath2);
textView2.setTypeface(typeface);
typeface = Typeface.createFromFile(fontPath3);
textView3.setTypeface(typeface);
typeface = Typeface.createFromFile(fontPath4);
textView4.setTypeface(typeface);
typeface = Typeface.createFromFile(fontPath5);
textView5.setTypeface(typeface);
}
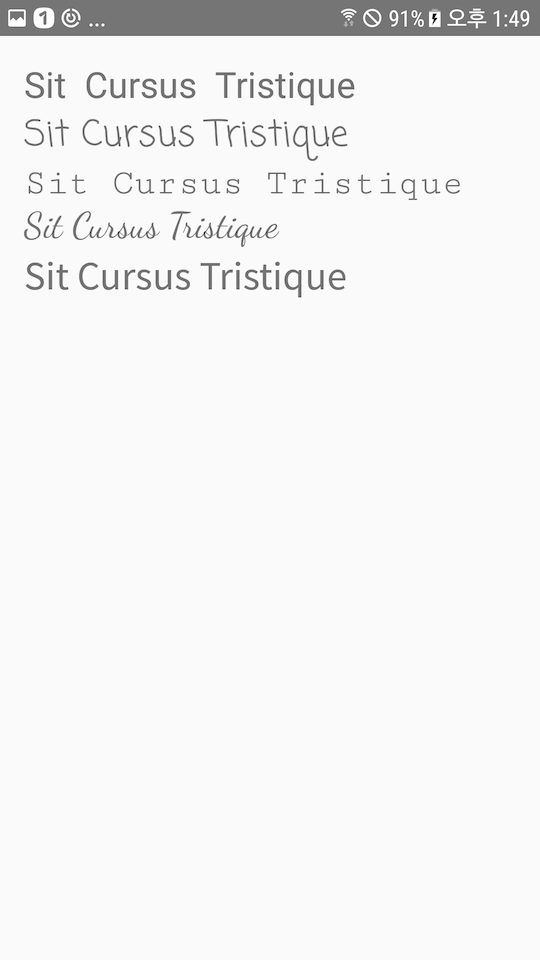
}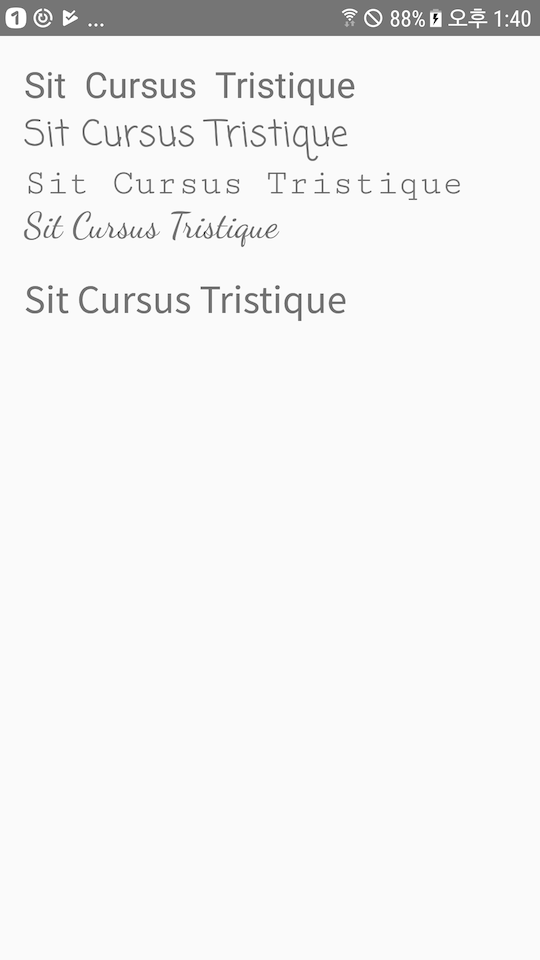 여기서 결과 화면을 자세히 보면
 NotoSansCJK-Regular.ttc 폰트를 적용한 폰트는 살짝 아래로 내려있는 것을 확인할 수 있는데, 해당 폰트에는 폰트 자체적으로 font-padding이 설정되있어서 다른 폰트와는 달리 지정된 TextView 영역을 빠져나오게 되버린다. 다른 폰트들 처럼 정상적으로 사용하기 위해선 xml의 Textview에 android:includeFontPadding="false"을 추가해주거나 코드 상에서 setIncludeFontPadding(false); 메소드를 사용하여 정상적으로 출력하게 할 수 있다.
<TextView
        android:id="@+id/customfont_textview_5"
        android:layout_width="match_parent"
        android:layout_height="wrap_content"
        android:textSize="24dp"
        android:includeFontPadding="false"
        android:text="Sit Cursus Tristique"/>
typeface = Typeface.createFromFile(fontPath5);
textView5.setTypeface(typeface);
textView5.setIncludeFontPadding(false);